Introducing Contentlayer (Beta): Content Made Easy for Developers
April 21, 2022
Working with content data (e.g. Markdown files or CMS) is a surprisingly difficult and laborious task when developing modern sites (e.g. with Next.js). Contentlayer is a that aims to make content easy for developers with a focus on great DX and performance.
We're very excited to officially release Contentlayer in beta after many months of alpha testing and already being used in over 300 projects.


Motivation: Thinking of Content as Data
How we build content-driven web experiences has evolved significantly over the past three decades. From monolithic CMSs (like Wordpress) over template-based site generators (like Jekyll) to modern web frameworks (like Next.js).
While developers gained more flexibility in the way they can design and structure their site - it also came at the cost of having to take responsibility over how to process and serve the content.
Local/Remote Content
Custom Content Processor
React Pages
Since most modern site frameworks (like Next.js, Remix etc) are "content agnostic", it's the responsibility of the developer to provide the content as data to the application in order to render it. This either means consuming the content data from an API (e.g. when using a headless CMS) or doing some form of manual content pre-processing which converts the raw content files (e.g. Markdown) into JSON data.
This content pre-processing step can be surprisingly difficult as the following example illustrates.
DIY Example with Next.js + Markdown
Let's look at a concrete example without Contentlayer (see source on GitHub). When building a website using Next.js with local Markdown files as your content source, you’d have to develop a mechanism that converted those Markdown files into data that you could use in your Next.js pages.
1
2
3
4
5
6
7
8
9
10
11
12
13
14
15
16
17
18
19
20
21
22
23
24
25
26
27
28
29
30
31
32
33
34
35
36
37
38
39
40
41
42
43
44
45
46
47
48
49
50
51
52
53
54
55
56
57
58
59
60
61
62
63
64
65
66
67
68
69
70
71
72
73
74
75
76
77
78
79
80
81
82
83
84
85
86
87
88
89
90
91
92
93
94
95
96
97
98
99
100
101
102
103
104
105
106
That's already a lot code for a simple use case - and it's just the tip of the iceberg. To achieve a more reliable setup with a decent developer experience, you’d have to also take care of the following:
- Write markdown processing logic, including working with content-processing libraries and their plugins. This is a lot of base-level logic and adds a number of dependencies to your project.
- Implement content validation to make sure your content matches the structure expected by your application.
- Cache processed content data to avoid unnecessary work. But caching is hard and Not caching degrades the developer experience and build performance.
- Incrementally regenerate only the content you changed to optimize rebuild/reload performance.
- Account for rich and complex content relations, so that objects can live as individual content files but be embedded as necessary when used as data.
- Most frameworks (e.g Next.js) don't support content live-reload. Building this yourself is usually very complicated.
- If you want to work with TypeScript and have strongly-typed data, you must write those types manually and hope that the content data matches your types.
Doing all of this is an insane amount of work - and you really shouldn't have to build this yourself.
Introducing Contentlayer
And that’s why we built Contentlayer. Contentlayer makes working with content easy for developers.
Content
Contentlayer
Pages
How Contentlayer Works
After installing Contentlayer via
npm install contentlayer next-contentlayer you're ready to go:-
First you need to tell Contentlayer where your content lives and which format and structure it has. There are different kinds of content sources - here we're using local Markdown files.12345678910111213141516171819
-
Run Contentlayer to transform the content into data. This can be done independently, or by hooking into framework server/build processes.posts/
- ├──
- ├──
- └──
.contentlayer/generated/- ├── Post/
- │ ├──
- │ ├──
- │ └──
- ├──
- └──
-
Use
importto work with your content, just as you would with any other data or code in your application.12345678910111213141516
Playground: Try it Yourself
To get a better feeling for how Contentlayer works and how to use it, it's best to actually use it. We've included a interactive playground with a real Next.js + Contentlayer project below. (Currently works best in Chrome on Desktop).
Go ahead - give it a try! For example, make a change to one of the Markdown files in the
posts directory - you should see the page live-reload instantly.- The content is generated into a
.contentlayer/generateddirectory that includes JSON content caches, exported collections of data, and automatically-generated types. - The
pages/posts/[[...slug]].tsxpage brings in the content directly, manipulates it as needed, and passes it onto the page component.
Benefits of Contentlayer
Contentlayer aims to provide a great developer experience (DX) through the following features:
- Content just works: Gone are the days of writing low-level content-processing logic. Instead, you set the rules and the content just works.
- TypeScript Support: Auto-generated TypeScript type definitions every document type.
- Content validation: Content is validated automatically with helpful error messages.
- Caching: Content builds are cached and incrementally regenerated - doing only the minimal amount of work necessary when changing your content.
- Live reload: The browser will automatically reload after changing content for those frameworks that support live reloading.
- Flexible content modeling: Contentlayer allows you to structure your content in a flexible and powerful way.
Build Performance Comparison: Contentlayer vs DIY and Gatsby
We put our claims to the test and built a simple benchmark study that compared a Next.js site with 1,000+ markdown content files to the same site using a DIY content processing method. We then built the same site with Gatsby.


Smaller is better/faster. Used machine: GitHub
Actions
In both cases, using Contentlayer was nearly twice as fast. Even when we tested against warm builds, where the frameworks could make use of cached artifacts from previous builds, Contentlayer was still nearly twice as fast. (Note these numbers might differ on machines with more CPUs as Contentlayer doesn't yet support parallel content processing.)
The Future of Content(layer)
This beta release of Contentlayer marks an important milestone in the roadmap of the project - but we're just getting started. Over the coming months leading up to a stable 1.0 release we're aiming to accomplish the following:
- Add support for more content sources (e.g. Contentful, Notion, ...) and even supporting multiple content sources in a single project
- Providing seamless integrations for more site frameworks (such as Vite, Remix, Astro, ...)
- Validate and evolve the core abstractions of Contentlayer to avoid breaking changes after the 1.0 release
Join the Contentlayer Community
You're invited to become part of the Contentlayer community by ...
- Following the tutorial and using Contentlayer into your project.
- Looking through examples and other open-source projects created with Contentlayer.
- Joining our welcoming Discord community.
- Reporting issues in the GitHub repository - Please also consider starring the repo 🌟
Thank You 💜
It took a significant amount of work to get to this point and I couldn't have done it without the help of others. Thanks a lot to everyone involved, especially to ...
- Everyone already using Contentlayer for providing early feedback shaping the project
- All contributors for reporting and investigating issues
- Stackbit for working together to bring this project to life
- Sean Davis and Lukas Wiesehan for helping to launch Contentlayer's new website and documentation
If you have any questions or feedback, please don't hesitate to get in touch or ask in our Discord community.

Johannes Schickling
@schicklingRelated Posts

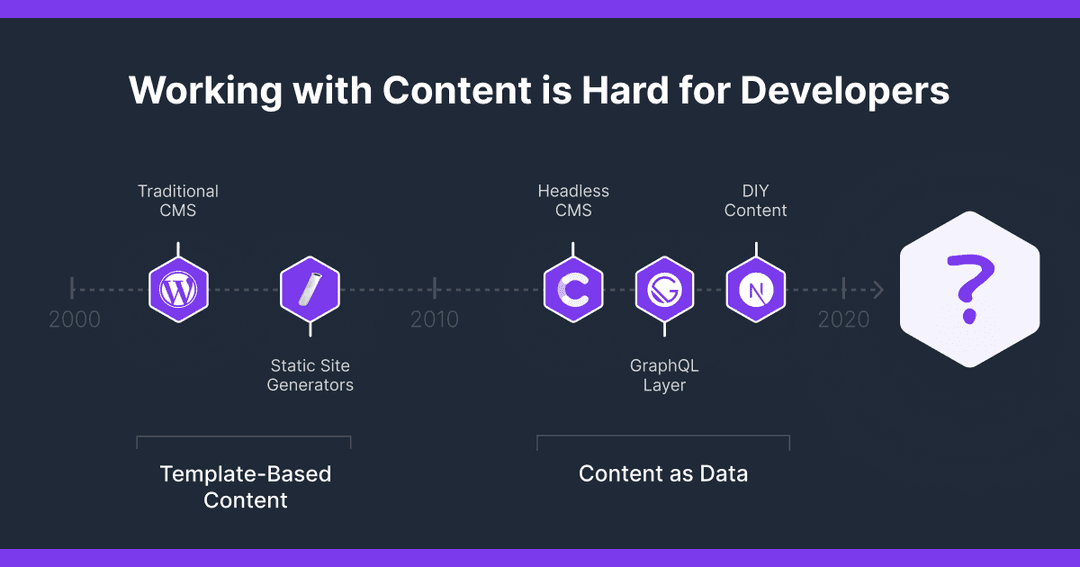
Why Working with Content is Hard for Developers
April 18, 2022
Sean C Davis
How we work with content on the web has shifted dramatically since the early days. Yet, working with content is still too difficult for developers.
Read more